DIY Journal Planner Notebook
- Tammy

- May 27, 2025
- 7 min read
Updated: Aug 7, 2025
A Composition Notebook Redesign!
"A great DIY journal that can be super stylish and even better than those extra fancy expensive designer journals just aren't in the normal budget!"

Who says DIY journals can’t be super stylish? ✨
Plus, they’re an awesome budget-friendly alternative when those fancy designer notebooks feel a little too pricey. Today, I’m spilling all the secrets on how to totally transform a plain old composition notebook into something uniquely YOU — using supplies you probably already have lying around! 🎨📓
I’ve been sitting on this post for a couple of months and I’m so pumped to finally share it with you! One of my favorite moments in my journaling/planning routine is cracking open a brand new notebook — it’s like a fresh adventure waiting to happen. Now, I keep a stash of high-quality notebooks on hand so I’m always ready to start a new project whenever inspiration strikes. But if you’re just dipping your toes into journaling or planner life (or, hey, “planner-ing” — yes, I just made that a word! 😜💜), or if you’re watching your wallet, those designer notebooks can be intimidating. They often run $10-$20 each, while you can grab composition notebooks for just 50 cents to $2. Score, right? 🙌
I’m going to show you how to turn a plain, boring composition notebook into a chic DIY journal you’ll love using for planning, bullet journaling, studying, doodling, daily journaling, scrapbooking, creative writing — you name it!
I seriously adore those classic black marble composition notebooks. You can find them almost anywhere, and they’re the perfect blank canvas for your DIY journal magic. Customize the cover, add an index, toss in some pockets — the possibilities are endless! Plus, they’re lightweight, budget-friendly, perfectly sized for comfy writing, and the paper develops that charming crinkly texture the more you use it. There’s just something about these notebooks that totally wins my heart every time. Ahhh, stationery love! 🙃💜
DIY Journal Planner Notebook
A Composition Notebook Redesign
Materials:
Here’s what I used to create my DIY journal—but trust me, these aren’t the only options! Start with whatever you’ve got on hand, then mix and match with new colors and materials to make it your own. 🎨✨
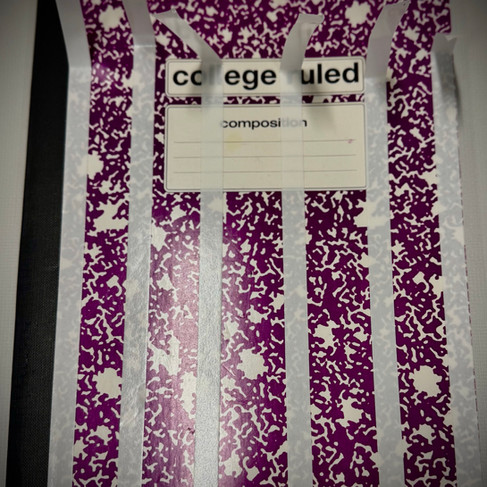
Composition notebook:Lined notebooks are everywhere, and I’m a big fan of college ruled—but sometimes wide ruled works better, depending on the project! You can usually snag them for less than a buck, especially during back-to-school sales (hello, 2 for $1 deals!). If you’re a fan of grid or dot paper for journaling, those work great too!
Mod Podge or double-sided tape:I usually go for the paper craft Mod Podge or the dishwasher-safe kind because that’s what’s in my stash. But when I’m feeling impatient (which is often 😂), I love using thin double-sided tape—no drying time needed!
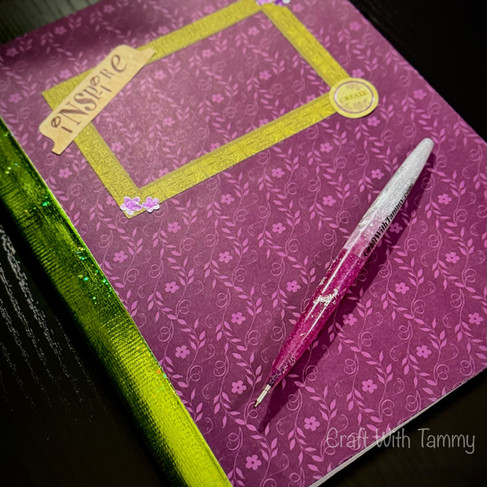
Scrapbook paper or gift wrap:I used scrapbook paper here because of all the fun colors and patterns, but leftover gift wrap works wonders too! If your wrapping paper is a bit thin, just glue a piece of printer paper behind it to hide that black-and-white marble pattern. Bonus: it makes your cover extra sturdy!
Colored duct tape:I found this sparkly green one at my local dollar store, and it screamed Disney magic! It matched perfectly with some of my scrapbook paper designs — talk about serendipity! ✨💚
A flat paintbrush:Use one you don’t mind getting messy, because you’ll be dipping it in glue. It’s all part of the fun!
A sponge brushGreat for smooth, even gluing without a fuss.
ScissorsYour trusty crafting sidekick.
A sharp craft knifeFor those precise cuts that scissors can’t handle.
A cutting mat or board:I finally treated myself to a self-healing mat (game changer!), but you can grab a small paper-craft cutting mat at the dollar store, or even use a sturdy cardboard box to protect your table. (Trust me, I’ve had my share of “Oops!” moments! 😅)
Ready to get crafty yet? Let’s do this! 🎉✂️💜
Directions:
Step 1: Let’s Get Started!
Begin by spreading a thin, even layer of Mod Podge, double-sided tape, or any adhesive you love all over your composition notebook. If you’re using tape, place strips along all the edges and a few in the middle. If you’re working with Mod Podge, move quickly so the glue doesn’t dry—then smooth it out with your sponge brush. Smooth... smooth... smooth! Pay extra attention to the edges to make sure your paper sticks perfectly all around.
If your decorative paper is thick enough to hide that classic marble pattern, you can skip right to Step 2 from here!
💡 CWT Tip: To keep glue off your pages, hold the cover away from the notebook when applying glue around the edges. Use your sponge brush to smooth everything out perfectly.
If your decorative paper is light or a bit thin, you’ll want to hide that marble pattern with a white layer first. While your glue or Mod Podge is still wet, place a sheet of white printer paper onto the front cover, starting at the spine and smoothing outward. Make sure there are no air bubbles and everything is stuck down tight. Repeat on the back cover, then let it dry for at least two hours before moving on. Otherwise, jump right into your decorative paper and head over to Step 3!
Once that first layer is dry, grab your craft knife and carefully trim the excess paper right up to the edges of the cover on both front and back. Now you’ve got a neat, clean white notebook ready for the next step!
Step 2: The Star of the Show!
Now for the fun part—your decorative paper! I love grabbing scrapbook paper on clearance or from Amazon, but wrapping paper scraps or any craft paper will work beautifully.
💡 CWT Tip: If you’re using gift wrap, cut it down to a manageable size first.
Just like before, apply a thin, even coat of Mod Podge over your white base layer. Work quickly and smooth it out with your sponge brush—smooth, smooth, smooth!
Step 3: Stick That Beauty Down!
While the glue is still wet (yes, seriously—this is super important!), gently lay your decorative paper starting at the spine and smooth outward. Once both sides are covered, let your notebook dry for 2 hours.
💡 CWT Tip: If your notebook warps a bit as it dries, no worries! Just place a heavy book on top to help it flatten back out.
Personally, I love the taping method because no waiting for glue to dry. I fold over the long edge first, then corners, then the smaller edges, wrapping everything neatly inside the covers. If you prefer the craft knife method, just trim away any excess paper carefully.
Step 4: Finish the Inside!
Cut a piece of matching or coordinating paper to fit the inside front and back covers. Repeat Steps 1 through 3 to glue it down for a polished, finished look. You can stop here—or go the extra mile and add a cute pocket!
Adding a pocket: Cut a piece of matching paper or cardstock about 3 inches smaller than the notebook’s long edge. Apply a thin line of glue around three edges, then stick it inside the cover starting at the spine and smoothing out any air bubbles. Let it dry completely.
Step 5: Trim Again!
Once everything’s dry and secure, go around the edges one last time with your craft knife to clean up any leftover paper.
Step 6 (Optional): Seal the Deal!
For extra durability, give your whole notebook one final coat of Mod Podge. Pay close attention to those edges—they’re the first to lift from wear and tear or being tossed in your bag. This extra layer protects your journal from sticky fingers and coffee spills too! Bonus: the paper formula dries matte and not sticky or shiny.
Step 7: Dress Up the Spine!
Cover the spine with colorful duct tape that complements your paper. Depending on your notebook, it might take a couple of strips. Smooth out any bubbles and trim the edges with scissors for a clean finish.
And Voila! 💜
You’ve got yourself a gorgeous DIY journal, ready to fill with all your brilliant ideas. These are perfect for bullet journaling, planning, travel notes, doodling—you name it! They also make thoughtful gifts for teachers, writers, teens, or that aspiring entrepreneur in your life. Don’t forget to check back soon for the matching pen and paperclip tutorial to complete your set. Perfect for holidays, birthdays, or just because! 😉
Wondering about that little black loop holding the pen on... Check back soon... I will be posting that super simple tutorial too! 😉
You'll be adding them to EVERYTHING!
This website is the project of an unpaid hobby, fully maintained and supported by CWT. There are NO paid affiliations, professional photographers, nutritionists or paid product reviews associated. CWT is not a certified artist, dietician or nutritionist. Any nutritional information shared on this site is an estimate counted through measurements and package nutritional information used in each recipe at that given time. If calorie, macro counting and other nutritional values are important to you and your health, CWT recommends running the ingredients through your choice of nutritional calculator you prefer. Calories can and will vary depending on national brands used per recipe. Anything created by using CWT's recipes, or tutorials is fully the readers responsibility. CWT is not responsible or will be held liable for the outcome of the readers completed project or recipe(s).
"This is a fantastic tutorial, Tammy. I sell fabric covered composition notebook over on Etsy. I would add to pay particular attention to the edges and make sure they are firmly glued down. As you use this notebook the edges take a beating and the paper will lift if not firmly secured. If that happens you can always put tape around the edge, from the outside folded over to the inside — this will give added protection and a cute edge."