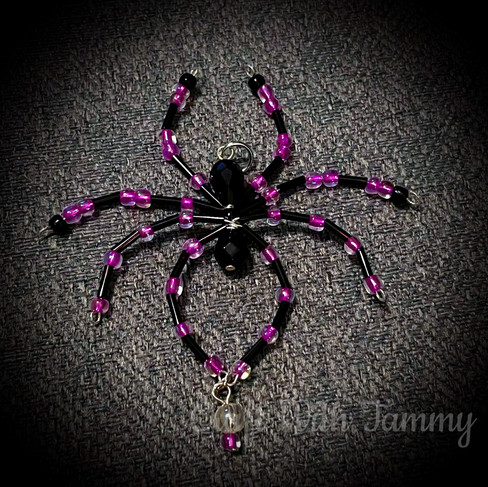
Beaded Spiders
- Tammy

- Oct 17, 2023
- 3 min read
Updated: May 25, 2025
"They make perfect Halloween decorations, but you can also make them into a Christmas spider ornament. You can tie fishing line through the little loop by the head and hang them, or you could even glue a magnet onto the body and display it on the fridge."

A little History....
"What is a Christmas spider?"
Spiders are seen as good luck in many cultures around the world, but in Eastern Europe (specifically Ukraine) spiders have a special connection to Christmas. There are many variations of the tale, but the story goes that a family of spiders investigated the tree at Christmas time and left webs all over it. When sunlight hit the webs the next morning they turned into gold and silver strands – giving us the origin of tinsel on Christmas trees! Today, to honor that folktale, beautiful beaded spiders decorate Christmas trees in Ukraine and all over the world! You can easily make these beaded spiders into Christmas spider ornaments, simply by tying fishing line or ornament hangers through the wire loop by the head.
Materials:
25 inches jewelry wire 22-24 gauge
1 large bead 10 - 20mm for body
1 medium bead 8-10 mm for head
100 small beads (2-5mm for legs
Equipment:
Directions:
Remember, you can make these any size you would like. If you decide to go larger, just increase your bead sizes and the amount used.
Step 1: Cut wires
Cut 5 lengths of wire that are each 5 inches long.
Step 2: Attach body bead
Take one piece of wire and use needle nose pliers to bend the end of it into a tight spiral.
Continue bending the wire into a tight coil that is large enough to cover the hole in the largest bead (used for the body). My coil was about 5 mm in size.
Take the other end of the wire and feed it through the center of the coil.
Pull the end of the wire completely through. This secures the coil and ensures that the hole of the large bead will sit in the center of the coil to stop it from falling through and gives the body a design.
Now slide the largest bead (the body) onto the wire until it's resting against the coil.
Step 3: Connect legs
Grab one of the other four wires and bend it roughly in half in a "U" shape to find the middle.
Slide the folded wire around the first wire, so it's sitting against the body bead.
Cross the folded wire around itself.
Pull the wire down on each side, securing it into place. You've just added the first two spider legs!
Repeat these steps with the next three wires and pinch the legs in place with your pliers. Don't worry about the legs intertwining - it only makes the spider more sturdy.
Step 4: Attach and secure head bead
You can now slide the medium sized head bead onto the center wire and press it tightly against the legs.
Cut off any excess wire, leaving at least 2 cm (3/4 inch).
Use the pliers to twist and push the end of the wire back into the head bead, creating a small loop to secure it.
Step 5: Bead legs
Bend and separate the 8 legs into their positions.
Begin beading the first leg. It's best to start with a small seed bead so it will rest right up against the spider's body. Use a mix of beads in a variety of sizes. I used 12 beads per leg, but the number will depend on the exact size of your beads.
Make sure to leave 5 - 10 mm at the end of the wire to finish off the leg. Use the needle nose pliers to create a small loop, just large enough to ensure the beads won't slide off.
Repeat and bead the other 7 legs.
Step 7: Arrange legs
Bend each of the 8 legs, somewhere around the middle of the leg, to create the leg "knee" joint.
Flip the spider over and adjust the legs so they all touch the table and are evenly spaced out.
Your beaded spider is now complete! Adjust to your liking for display.